
Landscaping
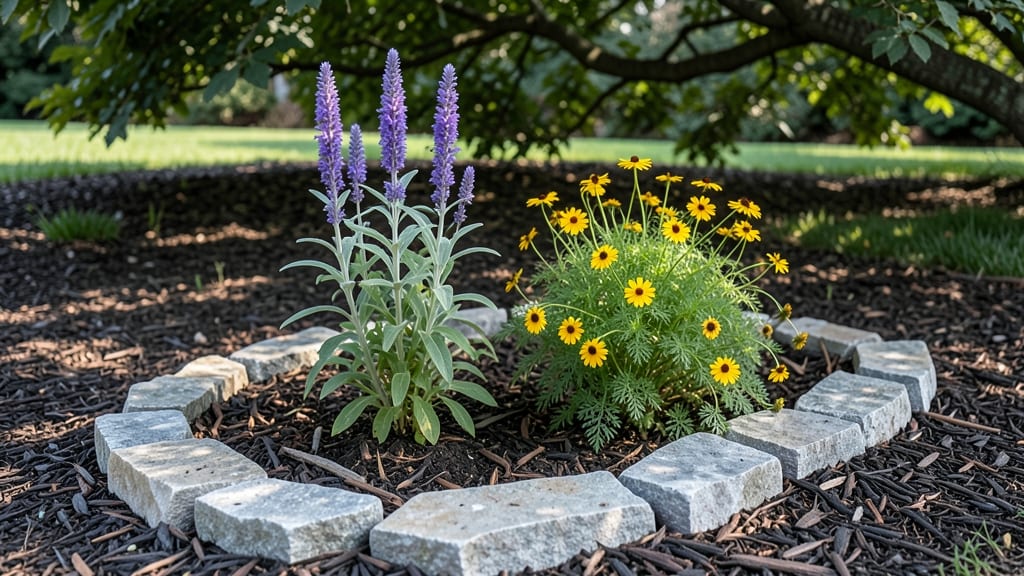
Curved landscaping stones for flower beds transform clunky rectangles into soft, inviting curves that make any garden feel like a designer retreat. 🌿 The right stones don't just hold back soil—they create movement, highlight focal points, and give your borders that polished look without the high price tag of pavers.
I've used everything from smooth river rocks to chunky flagstone, and the difference between a "garden" and a "landscape" often comes down to these details.
Start with the right materials: flagstone creates clean lines, gravel offers a natural, low-maintenance look, and river rocks add organic texture. For curved edges, flexible edging tape or landscape fabric keeps stones in place while allowing drainage.
A shovel, wheelbarrow, and rubber mallet are all you need for basic installation, and you can complete a 4-foot border in under an hour with two people.
What you end up with is a flower bed that looks intentional—not thrown together. The stones catch morning light differently, creating subtle highlights that draw the eye.
Weeds stay out, soil erosion slows down, and you get that effortless elegance that makes neighbors pause to ask, "What did you do to your garden?" The best part? Once installed, these borders last decades with minimal upkeep.
Works for everything from cottage-style gardens to modern minimalist designs. Whether you're framing a perennial border or lining a vegetable patch, the same principles apply. Let's get those stones laid!
📚 In This Guide
- What you need
- Instructions
- Tips and common mistakes
- Wrapping up and next steps
What you need
- ● Landscaping stones: Curved edging stones (12–18" tall, 6–12" wide)—quantity depends on flower bed size (e.g., ~1 stone per 2–3 ft of perimeter for a 4-ft bed). Opt for sandstone, bluestone, or flagstone for durability.
- ● Base material: Crushed gravel or landscape fabric (to prevent weeds). ~2–3 inches of gravel per 10 sq. ft.
- ● Tools: Rubber mallet (for gentle stone placement)
- ● Shovel & garden rake (for prep work)
- ● Wheelbarrow (for hauling materials)
- ● Level & string line (to ensure even curves)
- ● Safety gloves & knee pads (because comfort matters!)
- ● Landscape adhesive or sand (for extra stability)
- ● Edging tool (for clean cuts in tricky spots)
- ● Hose with spray nozzle (to rinse stones post-install)
- ● Decorative mulch (to complement your new stone borders)
How to install curved landscaping stones for flower bed edging
Here's the method I've used to create clean, organic borders that last for years.
🪴 Step 1: Plan and Mark Your Curved Layout
Start by sketching your design on paper first. I like to use a garden hose or flexible tape to lay out the curve directly in the bed—this lets you adjust the shape until it feels right. Step back frequently to check the flow from all angles, especially where the curve meets straight sections or other garden features.
Use landscape spray paint to mark the centerline of your stone placement. This gives you a consistent reference point for spacing. For most flower beds, I aim for stones to be placed every 12-18 inches along the curve, with the outer edge of each stone creating the finished border line. The wider spacing (18 inches) works best for larger, more dramatic curves.
💧 Step 2: Prepare the Base for Stability
Remove any grass, weeds, or loose soil along your marked line to create a clean working area. I dig down about 4-6 inches along the entire curve to create a shallow trench. This depth provides enough space for proper stone placement while keeping the stones at ground level.
For extra stability, especially on slopes or high-traffic areas, I add a 2-inch layer of compacted gravel at the bottom of the trench. This prevents soil from shifting underneath the stones over time. Use a plate compactor or even a heavy board to firmly press the gravel into place before adding any soil back.
✂️ Step 3: Install Stones Along the Curved Line
Begin placing your landscaping stones along the marked centerline, starting at one end and working toward the other. For curved edges, I use semi-circular or irregularly shaped stones on the outer curve and straight-edged stones on the inner curve to maintain visual balance. The stones should overlap slightly at the corners to create a seamless look.
As you place each stone, check that it sits level with the others. Use a rubber mallet to gently tap any stones that need adjustment. For particularly challenging curves, I cut stones with a masonry saw to create custom-fit pieces. The key is to maintain consistent spacing between stones—about ½ inch—to allow for natural soil expansion and prevent cracking.
🌿 Step 4: Secure Stones and Finish the Edging
Once all stones are in place, I fill the gaps between them with landscape fabric to prevent weeds from growing up between the stones. This step is crucial for maintaining a clean look with minimal maintenance. Cut the fabric to fit snugly and tuck it underneath the stones slightly to keep it in place.
Finally, backfill the trench with the removed soil, pressing it gently around each stone to secure them. For extra durability, I add a 1-inch layer of mulch along the inner edge of the stones. This helps suppress weeds and adds a polished finish. Water the area lightly to settle everything in place.
Tips & tricks for perfect curved landscaping stone edging
Between us, these are the little details that make the difference between a border that lasts and one that looks like it was thrown together. I've installed these curves for years, and here's what I've learned the hard way.
Layout Precision: That 12-18 inch spacing between stones isn't just arbitrary—it's about creating visual rhythm. For dramatic curves, I actually measure the first 3-4 stones carefully, then use them as a template for the rest. This ensures your curve maintains its flow without looking like a series of disconnected segments. The outer edge of each stone should create a clean, continuous line when viewed from a distance.
Stone Selection Strategy: Don't just grab any stones from the pile! Place them along your marked centerline first, then flip through your selection to find the perfect mix of shapes. Semi-circular stones on the outer curve naturally follow the contour, while straight-edged stones on the inner curve create clean transitions. Pro tip: Save your most irregularly shaped stones for the tightest turns—they'll disappear into the curve while adding character.
Stability Secrets: That 2-inch gravel base might seem like overkill, but trust me on this—it's what keeps your edging from shifting over time. For slopes, I actually increase the gravel to 3 inches and add a small lip on the downhill side to prevent stones from sliding. And here's what nobody tells you: If you're working with heavy stones, consider adding a layer of landscape fabric between the gravel and stones for extra grip.
Finishing Touches: The ½-inch gap between stones might seem small, but it's crucial for preventing cracking during freeze-thaw cycles. For extra durability, I brush a thin layer of sand into the gaps before adding mulch—this helps lock everything in place. And that 1-inch mulch layer? It's not just decorative. It acts as a weed barrier and helps retain moisture in your flower bed, keeping your plants happier for longer.
Pro Tips for Landscaping Stones For Flower Beds
- Between us, these are the little details that make the difference between a border that lasts and one that looks like it was thrown together.
- Layout Precision: That 12-18 inch spacing between stones isn't just arbitrary—it's about creating visual rhythm.
- Stone Selection Strategy: Don't just grab any stones from the pile!
Frequently asked questions
Got questions about using landscaping stones for flower beds? You’re not alone!
Here are answers to the most common queries—from installation tips to troubleshooting—to help you create stunning, low-maintenance garden borders with confidence.
What’s the best type of stone for curved flower bed edging?
For curved edging, opt for flexible, durable stones like sandstone, bluestone, or flagstone. These materials bend easily during installation and resist cracking over time. Avoid rigid stones like granite unless you’re cutting them to fit—curves require some give! Pro tip: river rocks or pebbles also work for a softer, natural look.
How long does it take to install landscaping stones for flower beds?
Installation time varies by project size and stone type. A small, simple curve (5–10 feet) takes 2–4 hours for prep, laying, and securing. Larger or complex designs may require a full day or more, especially if you’re digging trenches or using heavy stones. Plan ahead—rushing can lead to uneven edges or unstable borders!
Are there budget-friendly alternatives to premium landscaping stones?
Skip expensive flagstone by using fieldstone (often free from local farms) or recycled concrete pavers. For a DIY-friendly option, stepping stones or gravel can create a similar effect at a fraction of the cost. Just ensure your chosen material matches your garden’s aesthetic—natural textures blend best with flower beds.
How do I prevent stones from shifting or sinking over time?
Shifting stones are a common headache, but proper prep is key! Start by digging a 4–6 inch trench along your curve, then layer landscape fabric to block weeds. Backfill with gravel or sand before setting stones—this creates a stable base. For extra security, use landscape adhesive or mortar (for heavier stones) between joints. Regularly check for gaps and top up soil as needed.
Will landscaping stones smother my flower bed or block water?
Not if installed correctly! Stones shouldn’t cover the soil entirely—leave 2–3 inches of space between the top of the edging and the flower bed’s surface. This allows water to drain and roots to breathe. For added drainage, create a slight slope away from the bed. Mulch the flower bed separately to retain moisture while keeping stones in place.
Wrapping up and next steps
Transforming your flower beds with landscape stones isn’t just about aesthetics—it’s about creating a cohesive, low-maintenance space that thrives year-round. 🌿 Whether you opt for sleek bluestone, rustic fieldstone, or elegant granite, the right edging will define your garden’s style while protecting your plants.
Now that you’re armed with tips on selection, tools, and techniques, it’s time to roll up your sleeves and get creative!
Start small: pick one bed to test your new skills, or sketch a layout to visualize the flow. Every masterpiece begins with a single stone—yours could be next!