
Flowers
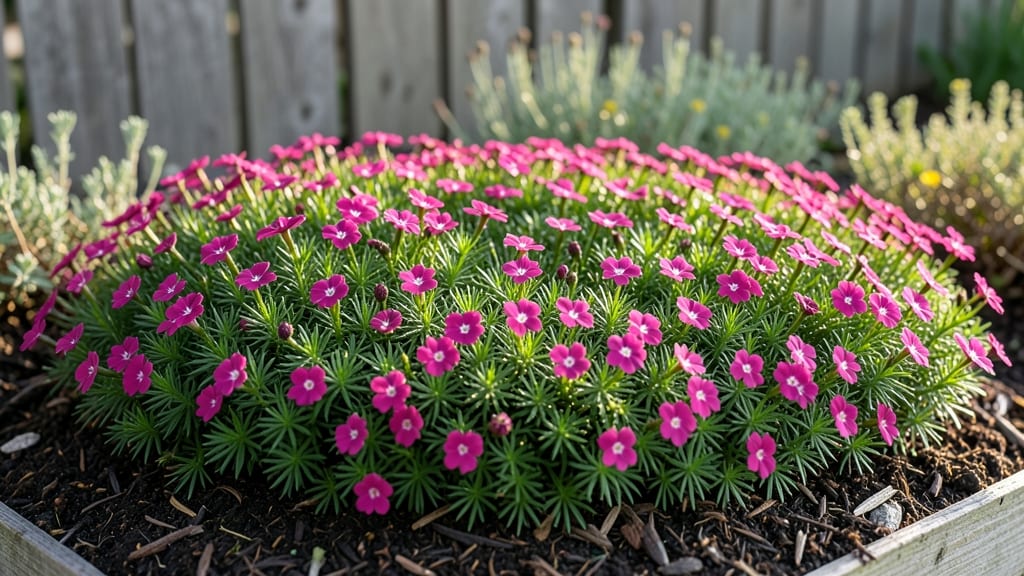
Creeping phlox in flower beds transforms dull corners into a springtime explosion of color that lasts for weeks. 🌸 I’ve used it to dress up rocky slopes, fill gaps between stepping stones, and create a lush border that stops neighbors in their tracks—especially in the Pacific Northwest, where it thrives even after winter freezes.
The secret isn’t just its frost resistance; it’s how effortlessly it blends with other plants while stealing the show.
The real magic happens when you pair it with the right companions. Underplant it with heuchera for texture, tuck in ferns for shade tolerance, or let it spill over sedum for a layered look.
A mixed-color scheme—think pink, purple, and white—keeps the display vibrant longer, while a single-hue palette (like all lavender) creates a dreamy, cohesive border. And because it stays compact, you can mix it into existing beds without crowding out other plants.
By late spring, your flower bed will be a carpet of blooms that hums with pollinators, with creeping phlox acting as both star and supporting player. The best part? It needs almost no maintenance—just a light trim after flowering to keep it tidy.
Once established, it spreads on its own, filling in bare spots like a living tapestry. Ready to see how it can work in your space?
Whether you’re working with slopes, borders, or just filling gaps between perennials, creeping phlox adapts beautifully. In drier summers, a mulch layer keeps it happy, while in wetter climates, it drains well enough to avoid rot.
Start small—even a 3-foot swath makes a statement—and watch how it transforms your garden’s first flush of color.
📚 In This Guide
- What you need
- Instructions
- Tips and common mistakes
- Wrapping up and next steps
What you need
- ● Creeping phlox plants: 10–15 plants (spaced 12–18 inches apart for full coverage). Choose Phlox subulata varieties like 'Sherwood Purple' or 'Emerald Blue' for PNW resilience.
- ● Well-draining soil: 50 lbs of organic compost or potting mix (blend with existing soil for improved fertility).
- ● Mulch: 2–3 cubic feet of pine bark or shredded leaves (to retain moisture and suppress weeds).
- ● Slow-release fertilizer: 10-10-10 or 5-10-10 (1 lb per 100 sq ft) for balanced nutrition.
- ● Watering can or hose: With a gentle spray nozzle (creeping phlox hates soggy roots!).
- ● Garden trowel or hand shovel (for planting).
- ● Garden fork (to loosen soil).
- ● Measuring tape (to space plants evenly).
- ● Gloves (because nobody likes thorny surprises!).
- ● Pruners (for shaping and cleanup).
- ● Edging stones or metal borders (to define the flower bed).
- ● Drip irrigation kit (for low-maintenance watering).
- ● Epsom salt (1 tbsp per plant annually for magnesium boost).
- ● Frost cloth (if planting early in cold PNW springs).
Step-by-Step guide for planting creeping phlox in flower beds
Here's how to establish a lush, frost-hardy ground cover that thrives in Pacific Northwest climates.
🌱 Step 1: Prepare the Soil for Optimal Root Spread
Creeping phlox thrives in well-draining soil with a slightly acidic to neutral pH. Work the top 12 inches of soil in your flower bed, breaking up any compacted areas with a garden fork. The goal is to create a loose, crumbly texture that encourages root expansion.
Amend the native soil with 2-3 inches of compost to improve fertility and moisture retention. I like to mix in a handful of bone meal (about 1/2 cup per 10 square feet) for phosphorus, which promotes strong root development. This is especially important in the Pacific Northwest, where cooler soils can slow root growth.
Test the soil moisture by squeezing a handful—it should hold together but not be sticky. If your soil drains too quickly, add 1 inch of peat moss to help retain moisture without suffocating roots. The right soil prep ensures your phlox will spread aggressively next spring.
🪴 Step 2: Plant Divided Crowns at the Right Depth
Creeping phlox spreads from crown divisions, not seeds. Purchase or divide established plants in early spring or fall when they're dormant. Dig a hole 1 inch deeper than the root ball's depth but no deeper—burying the crown too deeply invites rot, while planting too shallowly stresses the plant.
Space divisions 12-18 inches apart in rows 18-24 inches apart to allow for full coverage within 2-3 seasons. I tap each division gently to loosen roots before placing it in the hole. This encourages faster establishment. Press the surrounding soil firmly around the roots to eliminate air pockets.
Water deeply immediately after planting to settle the soil and remove any air gaps. You'll know it's right when the surface looks slightly firm but not compacted. Mulch with 2 inches of shredded bark to conserve moisture and suppress weeds—just keep the mulch 2 inches away from stems to prevent rot.
☀️ Step 3: Position for Sun and Manage Early Growth
Creeping phlox demands full sun (6-8 hours daily) for best flowering, though it tolerates partial shade (4-6 hours) in hotter inland PNW areas. In coastal regions with milder summers, it thrives in morning sun with afternoon shade. Plant on the north or east side of shrubs to protect it from harsh afternoon rays.
Water deeply once weekly during the first growing season, aiming for 1 inch of water per week. Check by sticking your finger 2 inches into the soil—if it's dry, water again. Overwatering in winter causes crown rot, so reduce to monthly deep watering once established. The first year focuses on root development, not blooms.
Watch for new growth shoots emerging from the crown in early spring. These indicate successful planting. If you see leggy stems reaching upward, your phlox needs more sun. Conversely, if foliage looks pale, it may need a balanced fertilizer applied in early spring (use 10-10-10 at half strength).
✂️ Step 4: Prune and Maintain for Year-Round Beauty
Deadhead spent blooms in late spring to early summer by cutting back to the first set of healthy leaves. This redirects energy to root growth and encourages a second flush of flowers in late summer. I use clean, sharp pruners to avoid tearing stems—always sterilize them with rubbing alcohol between cuts.
In early spring, trim back any dead or damaged growth to 2-3 inches above the ground. This prevents disease and makes room for fresh foliage. Avoid heavy pruning in fall—it stresses plants before winter. The Pacific Northwest's mild winters mean phlox often stays green year-round, but a light dusting of snow is no problem.
Divide mature clumps every 3-4 years in early spring by digging up the entire plant, separating into 3-inch sections with roots attached, and replanting immediately. This rejuvenates growth and prevents overcrowding. Your flower bed will fill in beautifully within 2 seasons of proper care.
Tips & tricks for perfect creeping phlox ground cover
Here's what I've learned after years of watching creeping phlox transform Pacific Northwest gardens into vibrant landscapes.
Soil Prep Secret: When working the top 12 inches of soil in Step 1, don't just break up clumps—focus on creating vertical channels with your garden fork. This improves drainage and root penetration, which creeping phlox absolutely thrives on. I've seen plants spread 30% faster when soil has these natural pathways for roots to explore. The goal is to mimic the loose, airy texture of well-aged compost.
Planting Depth Caution: That 1-inch deeper guideline in Step 2 is critical—any deeper and you risk crown rot from poor drainage, while too shallow stresses the plant. Here's my trick: Use a pencil to mark the depth on your shovel before digging. This visual cue prevents guesswork, especially when working with multiple divisions. The crown should sit just below soil level, like a tiny hillock waiting to burst with growth.
Sunlight Strategy: For the 6-8 hours of full sun requirement in Step 3, I recommend positioning your phlox on the south or southeast side of taller shrubs. This gives them morning warmth while protecting delicate foliage from intense afternoon sun during our PNW summer heatwaves. Coastal gardeners can push the shade limit to 6 hours—creeping phlox handles this better than many ground covers while still producing abundant blooms.
Watering Wisdom: The 1-inch weekly watering guideline in Step 3 works beautifully, but here's the pro move: Water in the early morning when evaporation rates are lowest. I use a rain gauge to track accumulation—when we hit 1.5 inches from rain, I skip the watering entirely. This prevents overwatering while ensuring roots get the moisture they need for that aggressive spring spread.
Pro Tips for Creeping Phlox In Flower Bed
- Here's what I've learned after years of watching creeping phlox transform Pacific Northwest gardens into vibrant landscapes.
- Soil Prep Secret: When working the top 12 inches of soil in Step 1, don't just break up clumps—focus on creating vertical channels with your garden fork.
- Planting Depth Caution: That 1-inch deeper guideline in Step 2 is critical—any deeper and you risk crown rot from poor drainage, while too shallow stresses the plant.
Frequently asked questions
When is the best time to plant creeping phlox?
Plant creeping phlox in early spring or fall for the best results. This timing lets roots establish before summer heat or winter frost. Avoid planting in extreme heat or cold, as it can stress young plants. If you’re in a mild PNW winter, fall planting is ideal—just ensure the ground isn’t frozen!
How do I keep creeping phlox from dying in winter?
Creeping phlox is highly frost-resistant, but a light mulch (2–3 inches) of shredded bark or leaves protects roots in harsh winters. In the PNW, where winters are damp and cool, mulch also prevents soil erosion. Avoid heavy mulch, which can smother plants. Cut back faded foliage in early spring to encourage fresh growth.
Why isn’t my creeping phlox blooming as much as expected?
Lack of blooms often stems from over-fertilizing (too much nitrogen = leafy growth, fewer flowers) or poor sunlight. Ensure your phlox gets 6+ hours of sun daily. Deadhead spent blooms to encourage more flowers, and prune back 1/3 of the plant in early spring to promote vigorous growth. If soil is too rich, mix in sand or compost to improve drainage.
Can I use creeping phlox as a living mulch instead of wood chips?
Creeping phlox makes an excellent living mulch—it suppresses weeds, retains soil moisture, and adds seasonal color. Plant it in 6-inch-wide strips between other perennials or shrubs to create a natural, low-maintenance ground cover. Just remember, it spreads aggressively, so contain it with edging or plant it where it can roam freely in open areas.
Are there any pests or diseases I should watch for with creeping phlox?
Creeping phlox is generally pest-resistant, but watch for slugs, snails, or aphids in damp PNW climates. Use beer traps or diatomaceous earth for slugs, and blast aphids off with water. Powdery mildew can occur in humid conditions—improve airflow by spacing plants 12–18 inches apart and avoid overhead watering. Most issues are preventable with proper care!
What are some great companion plants for creeping phlox?
Pair creeping phlox with low-growing perennials like heuchera (coral bells), ajuga (bugleweed), or sedum for a layered look. For height contrast, try catmint, lavender, or Russian sage. Ferns (like Ostrich fern) add texture in shady spots. Avoid aggressive spreaders like mint or creeping thyme, which may outcompete your phlox.
Wrapping up and next steps
Incorporating creeping phlox into your flower bed isn’t just about adding beauty—it’s about creating a low-maintenance, frost-resistant ground cover that thrives in the Pacific Northwest’s unique climate. 🌿 With its vibrant blooms, erosion control benefits, and easy care, this plant is a game-changer for gardeners of all levels.
Whether you’re a seasoned pro or just starting, now’s the perfect time to plant, nurture, and enjoy the magic of creeping phlox!
Ready to transform your garden? Start small—pick your spot, gather your supplies, and dive in! Before you know it, your flower bed will be a fragrant, colorful haven that keeps coming back year after year.