
Container Gardens
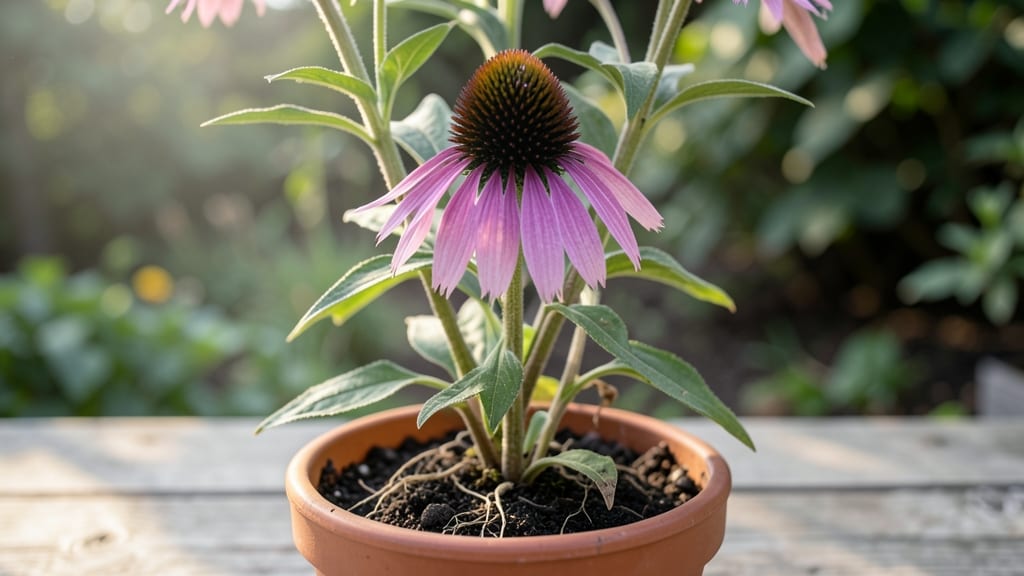
Growing coneflowers in pots unlocks their bold purple blooms even on balconies and patios where soil is shallow. 🌿 I learned the hard way that these tough perennials need at least 12-inch-deep containers to handle their deep roots—my first attempt in a 6-inch pot left them struggling by midsummer.
The right setup turns them into long-blooming stars that outshine store-bought flowers.
Start with well-draining potting mix (add perlite if yours compacts) and a container with drainage holes—coneflowers hate soggy feet. Place them where they get 6+ hours of sun daily, and you'll see those iconic daisy-like blooms appear by early summer.
The key is watering when the top inch feels dry, not on a schedule, which prevents root rot while keeping them thriving.
What you'll love most is how mobile these pots are—move them to catch morning sun in winter or shade from afternoon heatwaves. They also resist deer and rabbits, making them a low-maintenance choice for small spaces.
Plus, their long bloom time (June through frost) means you'll have color when most container plants fade.
For extra impact, pair them with salvia or catmint—the contrast of their textures and colors makes your pots pop. Just watch for root-bound plants (check by tugging gently at the roots) and repot every 2-3 years.
With these basics, your coneflowers will reward you with years of effortless beauty.
📚 In This Guide
- What you need
- Instructions
- Tips and common mistakes
- Wrapping up and next steps
What you need
- ● Coneflower plants: 1-3 Echinacea purpurea (or varieties like 'White Swan' or 'Hot Papaya') per pot. Choose nursery-grown plants or start from seeds (if planting from seed, allow 3-4 months for blooms).
- ● Pot: 1 container with a minimum 12-inch diameter and 10-inch depth (larger pots = happier plants). Ensure it has drainage holes to prevent root rot. 🚫💦
- ● Potting mix: 1 bag of well-draining, high-quality container mix (avoid garden soil—it compacts and holds too much moisture). Look for blends labeled for perennials or flowering plants.
- ○ Perlite or sand: 1 small bag (optional but helpful for improving drainage in heavier mixes).
- ● Slow-release fertilizer: 1 packet of balanced, granular fertilizer (10-10-10 or 20-20-20) or organic options like composted manure or worm castings.
- ● Mulch: 1 bag of organic mulch (e.g., shredded bark or pine needles) to retain moisture and regulate soil temperature.
- ● Garden gloves (to protect your hands from prickly stems).
- ● Trowel or small shovel (for planting and mixing soil).
- ● Watering can or hose with a gentle spray nozzle (coneflowers love consistent moisture but hate soggy roots).
- ● Measuring cup or scale (for adding fertilizer or perlite in precise amounts).
- ● Pruners or scissors (for trimming dead blooms or shaping the plant).
- ● Self-watering pot (if you travel often or have a busy schedule).
- ● Ebb-and-flow irrigation system (for automated watering).
- ● Decorative stones or pebbles (to add a polished touch to your container).
- ● Companion plants like salvia, black-eyed Susan, or ornamental grasses to create a stunning pollinator-friendly display.
- ● Plant labels (to track varieties and care tips).
Step-by-step guide for growing coneflowers in containers
Here's how to coax those striking purple blooms into containers with minimal fuss.
🪴 Step 1: Choose the Right Container and Soil Mix
Coneflowers need room to spread, so pick a pot at least 12 inches wide and deep for each plant. I always opt for terracotta because it breathes better than plastic, preventing root rot in the humid summer months. Make sure it has drainage holes—coneflowers despise soggy feet.
Fill the bottom third with gravel or perlite to create a drainage layer. Then, mix 2 parts potting soil with 1 part compost and 1 part perlite for excellent aeration. Coneflowers thrive in well-draining, slightly alkaline soil, so avoid garden soil unless you're amending it heavily. Press the mix down gently to remove air pockets but don't compact it too tightly.
🌱 Step 2: Plant Coneflower Starts at the Correct Depth
Dig a hole in the center of the pot twice as wide as the root ball but only as deep as the top of the root ball. Coneflowers hate being buried too deep—it encourages rot and weak stems. Gently remove the plant from its nursery pot and tease the roots apart if they're circling tightly.
Place the plant in the hole, then backfill with your soil mix, pressing lightly around the base to eliminate air gaps. Water deeply until moisture runs out the drainage holes. You'll know it's enough when the soil surface looks damp but not glistening. Avoid watering again until the top inch feels dry—coneflowers are drought-tolerant once established.
☀️ Step 3: Position for Maximum Sunlight and Airflow
Coneflowers demand full sun—at least 6-8 hours daily—to produce their signature purple blooms. Place your pots in a spot where they get morning sun and afternoon shade if you're in a hot climate. I've found that south-facing patios work best in most regions, but west-facing spots can work too if you provide afternoon shade during peak summer heat.
Space pots 18-24 inches apart to allow airflow, which prevents fungal diseases like powdery mildew. If you're growing multiple plants, group them together—they'll support each other's root systems through their extensive rhizomes. Watch for leggy growth; if stems stretch toward the light, your plants need more sun or a taller pot.
💧 Step 4: Water and Fertilize for Strong Blooms
Water once a week during the first month to help roots establish, then reduce to every 10-14 days once mature. Coneflowers store water in their deep roots, so they prefer deep, infrequent watering over frequent shallow drinks. Stick your finger 2 inches into the soil—if it's dry, water thoroughly until it drains from the bottom.
Feed with a balanced, slow-release fertilizer (10-10-10) at planting time, then again in early summer. I avoid high-nitrogen fertilizers—they promote leafy growth at the expense of flowers. Deadhead spent blooms by snipping stems back to the first set of healthy leaves. This encourages a second flush of flowers and keeps your pots looking tidy.
✂️ Step 5: Prune and Overwinter for Next Year's Blooms
In late fall, cut back stems to 4 inches above the soil line with clean, sharp shears. This prevents flopping and makes it easier to spot new growth in spring. Coneflowers are hardy perennials, so they'll bounce back year after year if you protect them from freezing temperatures. Move pots to a sheltered spot or wrap them in burlap during winter if your climate dips below 20°F.
In early spring, remove any dead foliage and add a 1-inch layer of mulch to retain moisture. You'll see fresh growth within 3-4 weeks—that's your cue to resume regular care. Coneflowers in pots reward patience with bold, long-lasting blooms that attract pollinators all season long.
Tips & tricks for growing coneflowers in containers
Here's what I've learned after years of growing these striking perennials in pots—small details that make all the difference.
Container Material Matters: While terracotta is ideal for airflow, you can use plastic pots too—just add an extra layer of gravel at the bottom to prevent moisture buildup. I've had great success with glazed ceramic pots as well, though they may require slightly more frequent watering. The key is ensuring proper drainage, regardless of material. For larger pots (over 18 inches), consider adding a second drainage hole if your pot only has one.
Soil Mix Secrets: The 2:1:1 ratio of potting soil to compost to perlite is perfect, but for even better results, add a handful of coarse sand to improve drainage further. I've found that mixing in a small amount of lime (about 1 teaspoon per pot) helps maintain that slightly alkaline soil pH that coneflowers prefer. This small adjustment can make a noticeable difference in bloom production and plant vigor.
Planting Depth Visual: When creating your planting hole, imagine the root ball sitting at the same level it was in its nursery pot. The top of the root ball should be just below the soil surface—no deeper, no shallower. A good trick is to draw a line on the pot at the root ball's top before removing it, then match that level in your new pot. This ensures proper root establishment without encouraging rot.
Sunlight Strategy: If your space only gets partial sun (less than 6 hours), place your coneflower pots on a rolling cart or dolly. This lets you move them to sunnier spots as the sun moves across your yard. I've seen dramatic differences in bloom production by giving plants just a few extra hours of direct sunlight during their critical morning growth period. Even a balcony or patio can work with this simple adjustment.
Pro Tips for Coneflower In Pots
- Here's what I've learned after years of growing these striking perennials in pots—small details that make all the difference.
- Container Material Matters: While terracotta is ideal for airflow, you can use plastic pots too—just add an extra layer of gravel at the bottom to prevent moisture buildup.
- Soil Mix Secrets: The 2:1:1 ratio of potting soil to compost to perlite is perfect, but for even better results, add a handful of coarse sand to improve drainage further.
Frequently asked questions
Got questions about growing coneflowers in pots? You’re not alone! Here are answers to the most common queries to help you cultivate stunning blooms with ease.
What size pot do coneflowers need?
For Echinacea (coneflower), aim for pots at least 12–16 inches wide and deep. Larger pots (18+ inches) give roots more room to spread, reducing the need for frequent watering. Ensure drainage holes are present to prevent root rot—coneflowers hate soggy feet!
How often should I water potted coneflowers?
Water when the top 1–2 inches of soil feel dry (usually every 5–7 days, but adjust for heat/wind). Overwatering is the #1 killer—stick your finger in the soil to check! Mulch the surface to retain moisture and keep roots cool.
Can coneflowers survive full sun in pots?
Coneflowers thrive in full sun (6+ hours/day), but in pots, they may need afternoon shade in scorching climates (Zones 8–10). If leaves turn yellow or wilt, move to partial shade temporarily. Morning sun + afternoon shade works well in hot areas.
What’s the best soil mix for potted coneflowers?
Use a well-draining mix like:
- 60% potting soil
- 30% perlite or coarse sand
- 10% compost
Avoid heavy garden soil—it compacts and suffocates roots. Add a handful of worm castings for extra nutrients without overfeeding.
How do I keep pests away from my potted coneflowers?
Coneflowers are generally pest-resistant, but watch for:
- Aphids: Spray with water or neem oil.
- Spider mites: Increase humidity (mist leaves) or use insecticidal soap.
- Japanese beetles: Handpick or use floating row covers.
Healthy plants = fewer pests! Ensure good airflow and avoid over-fertilizing.
Can I leave coneflowers in pots over winter?
In Zones 5–7, move pots to a sheltered spot (e.g., against a wall) and wrap in burlap for insulation. In Zones 8+, mulch heavily and protect from frost. Deadhead spent blooms in fall to encourage next year’s growth.
Wrapping up and next steps
Growing coneflower in pots is a fantastic way to bring bold color and easy-care beauty to patios, balconies, or small gardens. With the right soil, sunlight, and care, these cheerful blooms will reward you with vibrant purple hues and long-lasting flowers—all while thriving in confined spaces. 🌸
Ready to dive in? Start by gathering your supplies, pick the perfect pot, and follow the steps to create a stunning container garden. Your future blooms will thank you! 🌱
Next step: Sketch your pot arrangement, choose complementary plants, and get ready to enjoy a season of effortless elegance.