Flowers
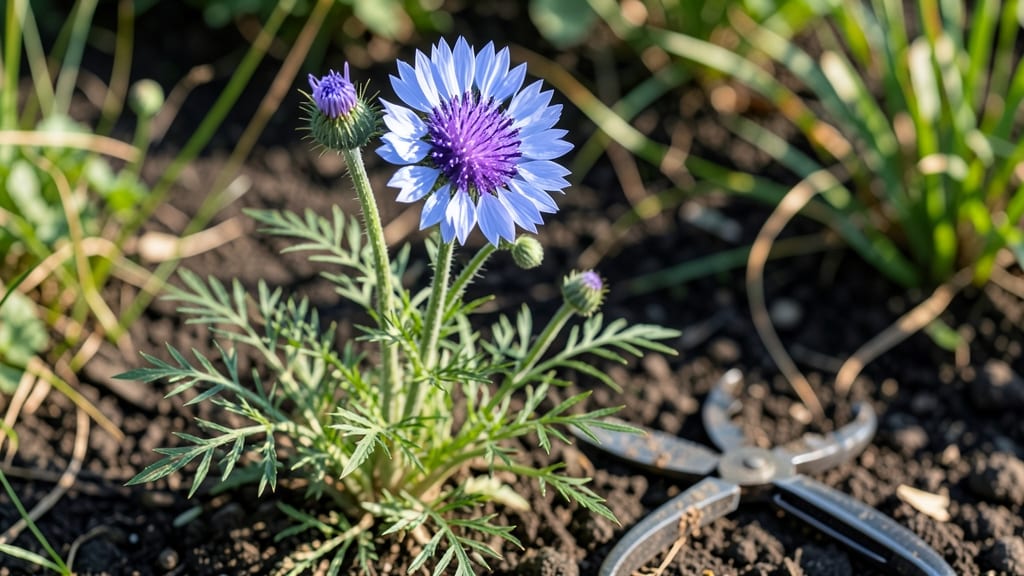
Bachelor button flowers (Centaurea cyanus) thrive in the Pacific Northwest's cool climate—just plant them right. 🌿 I learned the hard way that these cheerful blooms need well-draining soil and consistent moisture, or they bolt faster than you can say "rainy season."
The key is timing: sow seeds in early spring or late summer for frost-hardy varieties that keep blooming until fall.
The right conditions turn these flowers into a nonstop show from midsummer through frost. They love full sun but tolerate light shade, and their deep roots mean less frequent watering once established.
A light fertilizer in early spring gives them the boost they need for those signature blue, pink, or white blooms that last weeks in a vase.
Pruning spent blooms encourages more flowers, and their self-seeding habit means you’ll get surprises popping up next year. Even in damp climates, they stay sturdy—just avoid soggy soil, and you’ll have neighborhood-worthy color all season long. Ready to unlock their full potential?
Whether you’re filling gaps in borders or adding height to containers, these flowers adapt beautifully. Their drought tolerance once established makes them a low-maintenance superstar for busy gardeners. Let’s get those seeds in the ground!
📚 In This Guide
- What you need
- Instructions
- Tips and common mistakes
- Wrapping up and next steps
What you need
- ● Seeds: Choose Pacific Northwest frost-resistant varieties (e.g., 'Black Ball' or 'Blue Boy'). Aim for 10–20 seeds per planting area (or 1 seed per cell if starting indoors).
- ● Potting soil: 1–2 gallons of well-draining, seed-starting mix (or garden soil amended with compost for outdoor planting).
- ○ Containers (optional for indoor starts): 4–6-inch pots with drainage holes (1 per seedling) or a seed tray with individual cells.
- ● Outdoor garden bed or large container: At least 6–12 inches deep and 12+ inches wide per plant (or 10–15 plants per square foot for borders).
- ● Garden trowel or transplanting spade (for outdoor planting).
- ● Spray bottle (for gentle watering of seeds).
- ● Grow lights or sunny windowsill (if starting indoors before last frost).
- ● Garden gloves (to protect hands from soil and thorns).
- ○ Mulch (optional): Straw or shredded leaves to retain moisture and suppress weeds.
- ● Sunlight: Full sun (6+ hours daily)—bachelor buttons thrive in bright, open spaces!
- ● Climate: Ideal for USDA Zones 3–9; hardy to 10°F (-12°C) once established.
- ● Timing: Start seeds 4–6 weeks before last frost (indoors) or direct-sow after frost in early spring or late summer.
- ● Water source: Access to a hose or watering can for consistent moisture.
Step-by-step guide to growing Pacific Northwest-friendly bachelor buttons
Here's how to coax vibrant bachelor button blooms from seed in your region's cooler climate.
🌱 Step 1: Start Seeds Indoors at the Right Time
Bachelor buttons thrive when hardened off before your last frost date. I like to begin seeds indoors 6-8 weeks before transplanting, typically around mid-March for the Pacific Northwest. Use biodegradable seedling pots filled with sterile seed-starting mix—never garden soil, which can harbor fungal diseases that kill tender seedlings.
Plant seeds ¼ inch deep and keep the soil consistently moist but never soggy. I cover the pots with a plastic dome or plastic wrap to maintain humidity, then place them on a seedling heat mat set to 70-75°F. This warmth triggers germination in 7-14 days, though cooler indoor temperatures may extend this to 2-3 weeks. Watch for the first green shoots—this is your cue to remove the cover immediately to prevent damping-off.
Here's the thing—don't rush germination by overwatering. The soil should feel damp to touch but not dripping. Once seedlings emerge, move them to a bright, south-facing window or under grow lights for 14-16 hours of light daily. Without enough light, seedlings stretch toward the window, becoming weak and leggy.
☀️ Step 2: Harden Off and Transplant After Frost
When seedlings have 3-4 true leaves and are about 3 inches tall, it's time to harden them off. Start by placing them outside in a shaded, sheltered spot for 1-2 hours the first day. Gradually increase their outdoor time over 7-10 days, moving them to sunnier locations each day. This slow acclimation prevents shock and ensures they survive the transition.
Transplant after your last frost date, which in the Pacific Northwest typically falls between mid-April and early May, depending on your exact location. Choose a spot with full sun to partial shade—bachelor buttons tolerate light shade better than many annuals, making them perfect for gardens with afternoon sun. Space plants 12-18 inches apart to allow for airflow and prevent fungal diseases.
I always dig holes slightly larger than the root ball and mix in a handful of compost to boost nutrient availability. Water deeply after planting to settle the soil and remove any air pockets around the roots. Mulch with 2-3 inches of organic mulch to retain moisture and suppress weeds—this is especially important in the Pacific Northwest's often rainy springs.
💧 Step 3: Water and Fertilize for Continuous Blooms
Bachelor buttons are drought-tolerant once established, but consistent moisture is key during their first 4-6 weeks in the ground. Water deeply 2-3 times per week, aiming for 1 inch of water per week. You'll know you're doing it right when the soil feels dry to touch 1 inch below the surface between waterings. Overwatering leads to root rot, while underwatering causes buds to drop before opening.
Feed plants with a balanced, water-soluble fertilizer every 2-3 weeks during the growing season. I switch to a low-phosphorus formula once blooms appear to encourage more flowers instead of foliage. The Pacific Northwest's cooler summers mean you can extend the blooming season by providing evening water to keep roots cool and reduce stress.
Deadhead spent blooms regularly to encourage continuous flowering. Pinch off faded flowers with your fingers or snip them with clean scissors just above a set of leaves. This redirects the plant's energy into producing new buds instead of setting seed. You'll see a surge in new blooms within 7-10 days of consistent deadheading.
✂️ Step 4: Prepare for Winter and Renew for Next Season
Bachelor buttons are annuals, but their seeds often self-sow in the Pacific Northwest's mild winters. If you want to collect seeds for next year, allow some flowers to mature fully and dry on the plant. Once the seed heads turn brown and papery, cut them off and place them in a paper bag. Shake gently to release the seeds, then store them in a cool, dry place until spring.
For a fresh start in spring, repeat the indoor seed-starting process. I've found that saving seeds from your own plants ensures they'll thrive in your specific microclimate. If you prefer to start fresh each year, simply toss the old plants after they've finished blooming—their decomposed foliage adds nutrients back to the soil.
Real talk: Don't let bachelor buttons' delicate appearance fool you. These flowers are tougher than they look and handle the Pacific Northwest's occasional chilly nights with ease. With the right timing and care, you'll enjoy their cheerful blooms from late spring through fall, making them a standout in any garden.
Tips & tricks for Pacific Northwest bachelor button success
Took me a while to figure these out, so here's what nobody tells you about growing bachelor buttons in our region's tricky climate.
Seedling Heat Mat Strategy: The 70-75°F heat mat setting is non-negotiable for reliable germination. I've tried cooler setups, and germination drops dramatically—sometimes taking twice as long. Place your seedling tray on top of the mat rather than underneath to maintain consistent warmth at the soil level. If your home stays below 65°F, consider using a small greenhouse tent with a built-in heat source to compensate.
Lighting Upgrade: That 14-16 hours of light daily isn't just about quantity—it's about quality. South-facing windows work, but most homes don't get enough direct sunlight. I recommend LED grow lights on a timer for consistent results. Position lights just 6-8 inches above seedlings to prevent stretching, and adjust as they grow. The difference between leggy, weak seedlings and sturdy plants comes down to this lighting discipline.
Hardening Off Hack: When you're increasing outdoor time from 1-2 hours to full sun exposure over 7-10 days, I've found a simple trick works wonders: place a small fan near your seedlings during the last 30 minutes of each session. This mimics wind conditions they'll face outdoors and strengthens their stems. Start with low speed and gradually increase—you'll notice a dramatic difference in plant resilience after transplanting.
Frost Protection Secret: Bachelor buttons handle our region's occasional chilly nights better than most annuals, but there's one trick I swear by: apply a light layer of straw mulch around the base of plants after evening temperatures drop below 50°F. This creates an insulating barrier that maintains root zone warmth. I've seen plants continue blooming through nights that would normally cause damage to more delicate flowers.
Pro Tips for Bachelor Button Flower
- Took me a while to figure these out, so here's what nobody tells you about growing bachelor buttons in our region's t...
- Seedling Heat Mat Strategy: The 70-75°F heat mat setting is non-negotiable for reliable germination. I've tried coole...
- Lighting Upgrade: That 14-16 hours of light daily isn't just about quantity—it's about quality. South-facing windows ...
Frequently asked questions
Got questions about growing bachelor button flowers in the Pacific Northwest? You’re not alone! Here are some of the most common queries—and their answers—to help you cultivate these frost-resistant beauties with confidence.
When is the best time to plant bachelor button flowers in the PNW?
Plant seeds indoors 6–8 weeks before your last frost date (typically late March to early April in the PNW). Transplant seedlings outdoors after the soil warms to at least 50°F (10°C), usually in mid-to-late May. For direct sowing, wait until the soil is consistently warm, around late May or June.
Are bachelor buttons truly frost-resistant? How cold can they handle?
Yes! These hardy annuals (or perennials in mild climates) tolerate light frosts down to 25–30°F (-4 to -1°C). However, heavy freezes (<20°F/-7°C) may damage foliage. For extra protection, mulch young plants or grow them in containers to move indoors if needed. Varieties like Centaurea cyanus (cornflower) thrive in the PNW’s cool, damp springs.
Why aren’t my bachelor buttons blooming? Troubleshooting tips?
Slow blooming often stems from poor light (they need full sun, 6+ hours daily) or overcrowding. Thin seedlings to 12–18 inches apart. Deadhead spent blooms to encourage more flowers. If plants look leggy, they may need fertilizer (use a balanced 10-10-10 mix lightly). Pro tip: Bachelor buttons are self-seeding—if they flop in summer, they’re likely done for the year!
What are some bachelor button flower alternatives for the PNW?
If you love bachelor buttons but want variety, try these PNW-friendly frost-tolerant annuals:
- Sweet Alyssum (Lobularia maritima) – White/purple blooms, edible, thrives in cool weather.
- Calendula (Calendula officinalis) – Bright orange/yellow, medicinal, and self-seeding.
- Nasturtiums (Tropaeolum) – Edible, pest-repellent, and drought-tolerant.
- Cornflower (Centaurea cyanus) – A bachelor button cousin with striking blue blooms.
How long does it take for bachelor buttons to flower after planting?
From seed, expect blooms in 8–12 weeks under ideal conditions (full sun, well-drained soil, consistent moisture). Transplanted seedlings may flower 4–6 weeks faster than direct-sown seeds. Pro tip: Succession plant every 2–3 weeks for continuous color from early summer to frost!
Wrapping up and next steps
Growing bachelor button flowers in the Pacific Northwest doesn’t just add a pop of color to your garden—it’s a rewarding journey that even beginners can master!
From selecting frost-resistant varieties like Cornflower or Bachelor’s Button to nurturing them with the right soil and care, you’re now equipped to create a thriving floral display. 🌸
Ready to dive in? Start by gathering your supplies, picking a sunny spot, and planting your seeds or bulbs this season. Watch as your garden transforms into a vibrant, low-maintenance masterpiece—one that even the chillier PNW climate can’t slow down. Happy gardening! 🌱